Update(MM/DD/YYYY):12/20/2024
New Technique to Accurately Measure the Shape of Industrial Products
– Tip radius correction method developed for tactile coordinate measuring machine –
Researchers) WATANABE Mari, Researcher, SATO Osamu, Group Leader, MATSUZAKI Kazuya, Senior Researcher, KAJIMA Mariko, Attached to Research Group, WATANABE Tsukasa, Chief Senior Researcher, BITOU Youichi, Deputy Director, Research Institute, TAKATSUJI Toshiyuki, Emeritus Researcher, Research Institute for Engineering Measurement
Points
- Morphological operation improved measurement accuracy for shapes with small radii of curvature.
- Demonstrated that measurement variation can be reduced to the sub-micrometer order by applying it to turbine blade edge profile measurement
- Contribute to improving the reliability of quality assurance and reducing manufacturing costs of industrial products

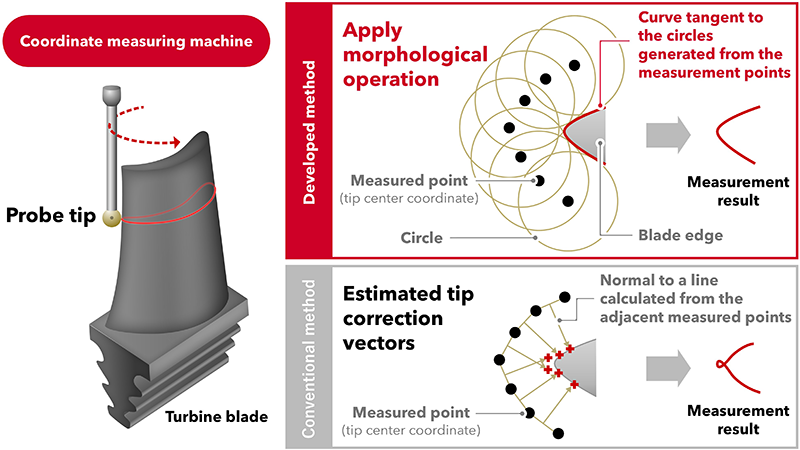
Conventional and developed method for shape measurement of turbine blades, etc., using tactile coordinate measuring machine
Background
The shape of some mechanical components can affect the performance of the entire product. In particular, some small components need to be manufactured with micrometer-order precision. For example, the shape of the edge of a turbine blade, as well as the smoothness of its surface, greatly affects the flow of gas through the turbine. A large deviation from the ideal shape, which is the design shape, will not only disrupt the gas flow and reduce the efficiency of power generation and rotation, but can also cause problems such as blade breakage. Shape measurement of industrial products is important to ensure their performance, including safety.
CMMs are generally used to evaluate the geometry of mechanical components. Tactile CMMs are widely used to measure complex shapes with high accuracy. However, when the object to be evaluated contains a shape with a small radius of curvature, the conventional method incorrectly estimates the tip correction direction, resulting in a measurement variation of several micrometers, which can lead to measurement results that differ from the actual shape. To ensure the safety of industrial products, it is necessary to evaluate whether the dimensional accuracy of the component meets the requirements. Consequently, measurement variations led to conforming shapes being evaluated as non-conforming, often imposing unnecessary costs.
Summary
Researchers at AIST have developed a technique to improve the reliability of shape measurement on industrial products.
Several industrial products need to be manufactured with micrometer-order precision. For turbine blades used in generators and engines, the slightest deviation from the designed shape not only affects the efficiency of power generation and rotation, but can also cause trouble during operation. Therefore, the shape of industrial products must be accurately evaluated using a Coordinate Measuring Machine (CMM). However, when curved surfaces with a radius of curvature smaller than a few millimeters are measured with a tactile CMM, errors of a few micrometers can occur due to the data processing in the measurement by use of a probe tip with a finite size of approximately 1 mm in radius.
In this research, we have developed a method to reduce measurement variation to the sub-micrometer order by applying morphological operation, which is used for noise reduction in image processing and surface roughness measurement, to the measurement using a tactile CMM. We have also applied the developed method to the measurement of a turbine blade edge profile, and have demonstrated that the measurement variation is reduced. This is expected to improve the reliability of shape measurement on industrial products and lead to assurance of quality and safety, such as dimensional accuracy.
Details of this research were published online in Precision Engineering on September 11, 2024.
Article information
Journal: Precision Engineering
Title of paper: Accurate surface profile measurement using CMM without estimating tip correction vectors
Author: M. Watanabe, O. Sato, K. Matsuzaki, M. Kajima, T. Watanabe, Y. Bitou, T. Takatsuji
DOI: 10.1016/j.precisioneng.2024.09.009