– Reproducible crack length measurement for the indentation fracture method by visualizing the tips of the cracks –
Hiroyuki Miyazaki (Senior Researcher), Ceramic Structure Controlling Group (Leader: Yu-ichi Yoshizawa), the Advanced Manufacturing Research Institute (Director: Masanobu Awano) of the National Institute of Advanced Industrial Science and Technology (AIST; President: Ryoji Chubachi), has developed a noble measurement technique for precise and quick evaluation of fracture resistance of ceramics.
In the developed technique, a visualizing solution is applied on the indented surface of ceramic test piece during fracture resistance testing by the indentation fracture (IF) method. The concentration of a commercially available solution was optimized and the solution was diluted to produce the visualizing solution. This could enhance the contrast of the image of the crack tips, reducing errors in reading crack lengths. Measurements of fracture resistance of ceramics by the IF method will become accurate and reproducible since it uses crack lengths for the calculation. The developed reliable technique enables the qualitative assessment of performance of tiny advanced ceramic products and will contribute to the increase on Japan’s global market share of ceramic products.
The results will be presented at the annual meeting of the Ceramic Society of Japan to be held from March 17 to 19, 2014, at the Hiyoshi campus of Keio University (Yokohama, Kanagawa).
 |
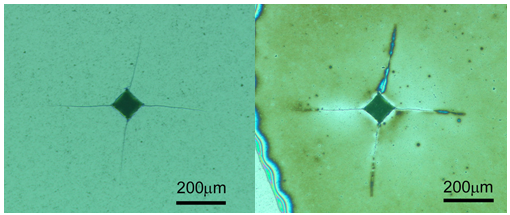
(Photo) Metallurgical microscope images of an indentation on a surface of ceramic sample
The faint image of crack tips observed with the conventional method (left) became clear and
visible enough to measure the crack lengths by the developed method (right). |
International market of high-performance small ceramic products such as bearing balls and cutting tools has been expanding. Fracture resistance testing by the IF method (JSI R 1607) is an important evaluation tool for mechanical property of such tiny products. However, quick and accurate detection of crack tip position using a metallurgical microscope has been difficult and only skilled operators can precisely measure the crack length, which is required to calculate the fracture resistance. Thus, inferior reproducibility has been reported so far, and some foreign experts insist that the method should not be used as a regular practice.
AIST has been developing an improved IF method which yields reproducible, reliable, and precise results so far to propose a new international standard of the IF method for evaluation of fracture resistance of advanced ceramics. It has clarified that the low reproducibility of the conventional IF technique is originated from the misreading of the crack length. In order to dissolve the problem, AIST proposed a new measuring method using high-powered optics with both a traveling stage and an objective lens with a magnification of 40 or 50. Both domestic and international round-robin tests on the proposed technique have demonstrated good matching between the laboratories. However, the improvement was not so significant for some ceramics with a weak contrast of the cracks. Thus, the enhancement of the contrast of crack tips was necessary for further improvements.
Domestic round-robin tests of the developed technique were aided by “the workshop on innovation for reliability in bulk ceramics” of the Ceramic Society of Japan and the organizer of the workshop, Kouichi Yasuda (Associate Professor) of Tokyo Institute of Technology.
Crack lengths made by the indentation of a diamond indenter are measured in the IF method for fracture resistance. The developed technique improves the visibility of the crack tips on the ceramic surface to make evaluations of fracture resistance easier and more accurate.
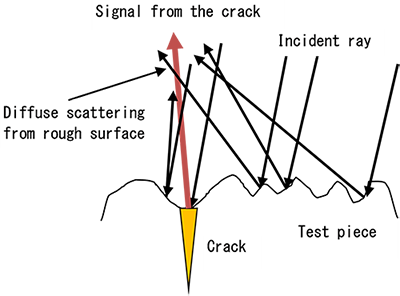
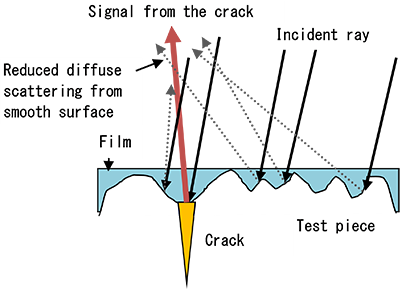
Detection of the correct crack tip position by conventional systems is often difficult due to the weak contrast of the crack even when the resolution of the image is improved with the high-powered metallurgical microscope. The weak contrast is attributable to the diffuse scattering of the incident ray by the slight roughness which remains even on the mirror finished surfaces (Fig. 1). In the developed technique, a crack visualizing solution with a proper concentration is prepared from a commercially available transparent solution and coated on the indented surface to make a thin transparent film on it. It is likely that the diffuse scattering is reduced by the smooth surface with the thin film so that the image of cracks becomes clear (Fig. 2). It is probable that the thickness of the film near the crack differs from that of other part, resulting in the difference between interference color of the crack vicinity and that of other parts. This coloring of the crack region also improves the visibility of the crack. These phenomena only occur when the concentration of the solution is adjusted properly. If the solution is too weak, the thickness of the film becomes too thin to improve the crack image. By contrast, if the solution is too strong, the formed thick film hinders the visibility of the crack. All these effects in the newly developed technique enable the precise measurement of crack lengths even when the ordinary metallurgical microscope with a total magnification of 100 - 200 is employed for the observation.
 |
Figure 1 : Cross section of the sample with a rough surface and a crack (conventional method)
The diffuse scattering from the rough surface deteriorates the visibility of the crack. |
 |
Figure 2 : Cross section of the sample with a smooth surface and a crack (developed technique)
The reduced diffuse scattering from the smooth surface with a thin film improves the visibility
of the crack. |
The domestic round-robin tests with nine laboratories including universities, national laboratories, and ceramic makers demonstrated that the good reproducibility of fracture resistance measurements could be obtained with the same test samples by employing the developed technique and the validity of the technique was verified.
It is expected that the Japan’s share of the high-performance small ceramic products in the global market will expand when the developed technique is adopted as an international standard (ISO) since the standardized technique ensures the fare mechanical property evaluation of such products. An automatic measuring system for fracture resistance will be developed using the developed technique since the enhanced crack contrast in this method allows crack image analysis by computers. Conventional measuring method has been suffering from the bad reproducibility of the results due to the subjectivity of the operators. The automatic measuring system, thus, is promising not only for high reliability of the results but also for labor saving.
An international round-robin test with foreign laboratories will be performed to verify both feasibility of the developed method and reproducibility using the same samples. A draft standard will be presented to the ISO committee after the advantages of this technique, simplicity and high reliability, are well known to those entire relevant engineers and researchers.