Update(MM/DD/YYYY):01/07/2009
Visualization Technology for Invisible" Danger"
- Diagnosing damages in structures and their danger level at the same time using elastico-luminescent materials -
Points
-
A technology that enables the simultaneous detection of the existence of damages in structures and their danger level.
-
The generation and propagation of minute cracks can be visualized using elastico-luminescence on site.
-
Applications in the health monitoring and nondestructive testing of pipelines, tanks, aircraft and other such structures are expected.
Summary
Chao-Nan XU (Leader), the Advanced Integrated Sensing Team, Naohiro Ueno (Leader), the Adaptronics Technology Team, and their team members, the Measurement Solution Research Center (Director: Kazuo Igarashi) of the National Institute of Advanced Industrial Science and Technology (AIST) (President: Hiroyuki Yoshikawa) have developed a technology for visualizing structures defects/damages and their danger levels, which cannot be seen directly from outside, by using luminous intensity distribution of elastico-luminescent materials.
Nondestructive testing techniques using X-rays and ultrarsonic waves are used to detect defects in structures. However, it is very difficult to evaluate the danger levels of defects by those techniques. Although it is necessary to detect abnormalities in stress fields simultaneously of defects in order to ascertain the danger levels of defects, it has to date been difficult to detect defects and their stress fields at the same time.
The visualization technique we have developed is to coat the surfaces of structures with a paint that includes minute particles that emit light as a result of mechanical stimulation (elastico-luminescence). Thus, when the structures are subjected to force or vibration, the stress fields and danger levels of defects are made plainly visible at the same time as making the generation and location of defects, such as cracks that do not appear on the surfaces of structures, visible in real time due to luminecence intensity distribution on surfaces generated by stress. The positions and the danger levels of the cracks are detected simultaneously by using this technology, as invisible fatigue cracks and the undetectable stress concentrations of crack tips are made visual by coating metal plates with a paint that includes elastico-luminescent materials.
These results will be presented at FY 2008 Open Symposium of "Advanced Integrated Sensing Technologies," which is one of the research areas in Core Research for Evolutional Science and Technology (CREST) of the Japan Science and Technology Agency, to be held in Tokyo on November 18, 2008.
 |
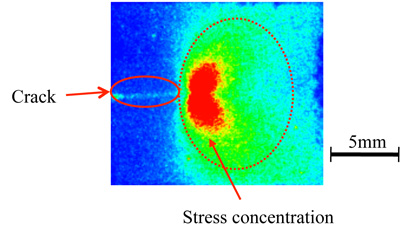
Seeing the “invisible” fatigue crack and the stress concentration at the crack tip
on a metal plate with elastico-luminescent coating |
Social Background for Research
Many accidents have occurred as a result of decrepit and poor maintenance of infrastructures and industrial structures, and the need for technologies to prevent such accidents and promote a long life for such structures has risen rapidly in recent years. In Japan, the development of innovative safety management technologies, especially nondestructive testing technologies, advanced health monitoring and diagnosis technologies making good use of sensors, and evaluation and management technologies for structures, are provided as strategic important science and technology projects under "The Third Period Science and Technology Basic Plan."
Although there are technologies using X-ray and ultrasonic waves as nondestructive inspection technologies for structures, it is difficult to detect simultaneously abnormalities in stress fields, which is required to ascertain the danger level of defects, even if the defects are detected. Although there are methods of using strain gauges and optical fibers to detect stress, a large number of sensors are needed to measure a stress field that is the distribution of stress. Moreover, it is impossible for the conventional sensors to detect stress by disconnecting when a crack actually occurs, and they cannot detect abnormalities in a stress field and the occurrence of a crack at the same time.
There remain a lot of problems such as the above that cannot be handled by conventional technologies, and safety inspections of pipelines at factories and tunnels and other facilities are greatly dependant on manual inspections, such as percussion inspection, and many areas of inspection depend upon the experience and intuition of the inspection engineers. The provision of safety and security that relies on human beings for many of its parts has now reached a critical point because a lot of skilled engineers are retiring, and the number of their successors, as well as skill succession, is insufficient to meet demands. The development of a safety management technology to detect potential danger by the simple, easy and reliable detection of defects and their danger level is urgently required.
History of Research
The Measurement Solution Research Center of AIST conducts a series of research and development projects, ranging from the elucidation of the mechanism of elastico-luminescence through to material development, producing devices, and systematization and application development. We have developed materials that show stronger elastico-luminescence, have produced nanometer-sized particles of elastico-luminescent materials, have succeeded in making paints that can be applied to the surfaces of structures, and have enabled observations of various mechanical phenomena of structures. We have clarified that the numerical calculation results of stress distribution and measurement values in existing technologies show a high correlation with elastico-luminescent intensity distribution by performing stress analysis of structures with elastico-luminescent materials as a part of application development.
This research is executed as a part of a project titled "Creation of a safety management network system using elastico-luminescent materials” in the research area "Advanced Integrated Sensing Technologies " of CREST sponsored by the Japan Science and Technology Agency.
Details of Research
Phenomena, from micro-scale to macro-scale, can be detected because elastico-luminescent materials are powdery minute ceramic particles (the diameter of which can be controlled), and each minute particle is a sensor that converts a mechanical signal directly into a light signal. When these minute particles are spread over a surface, an overall view of stress concentration is obtained in the form of image information, due to the luminescence of the individual minute particles. Therefore, local defects occurring in an area and their abnormal stress and danger levels can be monitored at high resolution, while observing the overall area. This is the major feature of this technology.
Figure 1 shows an example of the simultaneous measurement of a defect and stress distribution. Paint containing elastico-luminescent materials was applied to a metal plate (Fig. 1A), and the invisible fatigue crack is visualized thanks to elastico-luminescence (Fig. 1B), and at the same time, the undetectable stress concentration at the crack tip is made visible. In a word, the location and the danger level of a crack are detected at the same time (Fig. 1C).
 |
|
(A) Photo image of the metal plate coated with elastico-luminescent film
|
(B) Elastico-luminescent image under the application of a small load (20N) |
(C) Luminescence image under the application of a large load (12kN) |
|
Fig.1 Seeing the “invisible” fatigue crack and the stress concentration at the crack tip on a metal plate with elastico-luminescent coating. |
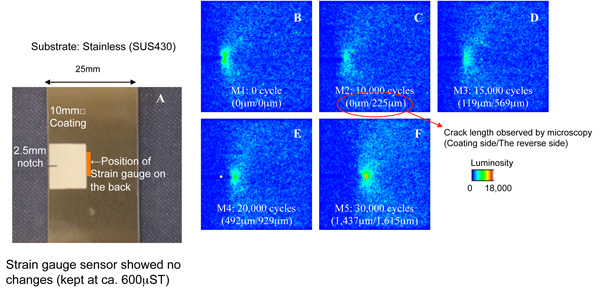
Figure 2 shows an example of the detection of the progress of a fatigue crack in a stainless steel plate. Elastico-luminescent materials were spread over a 10 mm × 10 mm area of a stainless steel plate measuring 25 mm wide and 3 mm thick, on the left side of which a notch 0.5 mm wide and 2.5 mm long was made as shown in Fig. 2A. A strain gauge was positioned at the center on the back of the plate, and the strain was measured. A crack started spreading from the tip of the cut on the left side of the plate over the passage of time, and progressed to the right gradually as tensile force was applied continuously by means of a fatigue tester. Figure 2, B to F, shows a series of images that document the propagation of the crack using elastico-luminescence. Stress concentrates around the tip of the crack, so the intensity of elastico-luminescence in that part is stronger than in the surrounding areas. Moreover, the stress distribution of the surroundings can be observed as a distribution of luminous intensity. The strongest location in luminescence intensity moves to the right with the passage of time, and is the tip of the progressing crack. In addition, the abnormal stress value can be measured by the luminescence intensity, and the danger level of the crack can be ascertained. No change over the passage of time could be measured with the strain gauge, that is, the strain gauge sensor can not detect any appearance of cracks and damages in this case. Elastico-luminescence made it possible to detect a minute fatigue crack (C) that had occurred only on the back of the stainless steel plate, in addition, its progression and level of stress concentration could be chartered simultaneously, which is impossible using conventional technologies.
 |
|
Fig.2 The visualization of the progress of a fatigue crack in a stainless steel plate. |
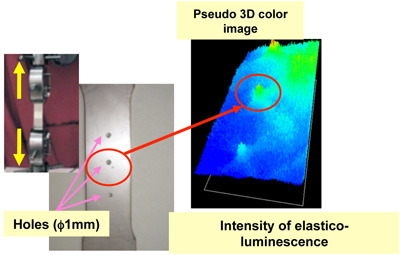
Figure 3 shows an example of detecting defects at different levels simultaneously. Elastico-luminescent materials were spread over the surface of a metal plate in which 1-mm holes of different depths (defects) had been drilled (Fig. 3, center) in the reverse side, and the metal plate was placed under tension in a test machine (Fig. 3, left), and the elastico-luminescence distribution, shown in the image on the right of Fig. 3, was observed on the surface, corresponding to defect locations. This image shows elastico-luminescence intensity in pseudo-3D color images, and displays the colors in the order: blue → green → yellow → red, as luminecence intensity increases. The areas where the intensity of elastico-luminescence is stronger correspond to the positions of the holes drilled in the back of the plate, and the intensity is stronger corresponding to the depth of the holes - the deeper, the stronger. Defects on the back of, or in, a metal plate can be detected by observing abnormalities in the elastico-luminescence distribution because elastico-luminescence is uniformly distributed over the surface of the plate if there are no defects. That is, the positions of defects and their danger levels can be rendered visible using elastico-luminescence images.
 |
|
Fig.3 Nondestructive evaluation example: Metal plate with elastico-luminescent coating on the surface and small holes inside. |
Future Schedule
This technology is expected to find applications in the safety management of pipelines, tanks, aircrafts and other structures.
In the future, the development of devices that record stress history as the color of the elastico-luminescence coating changes, the development of a sensor network node, and integration systematization will be executed based on the abnormality and danger-detection technology we have developed. We aim to develop a safety management network system that inclusively monitoring the safety and security of structures by demonstrative tests in cooperation with enterprises and other organizations. Moreover, we would like to work on applications in full-field stress visualization for nondestructive inspection technologies and on basic research into the occurrence and propagation of force.